
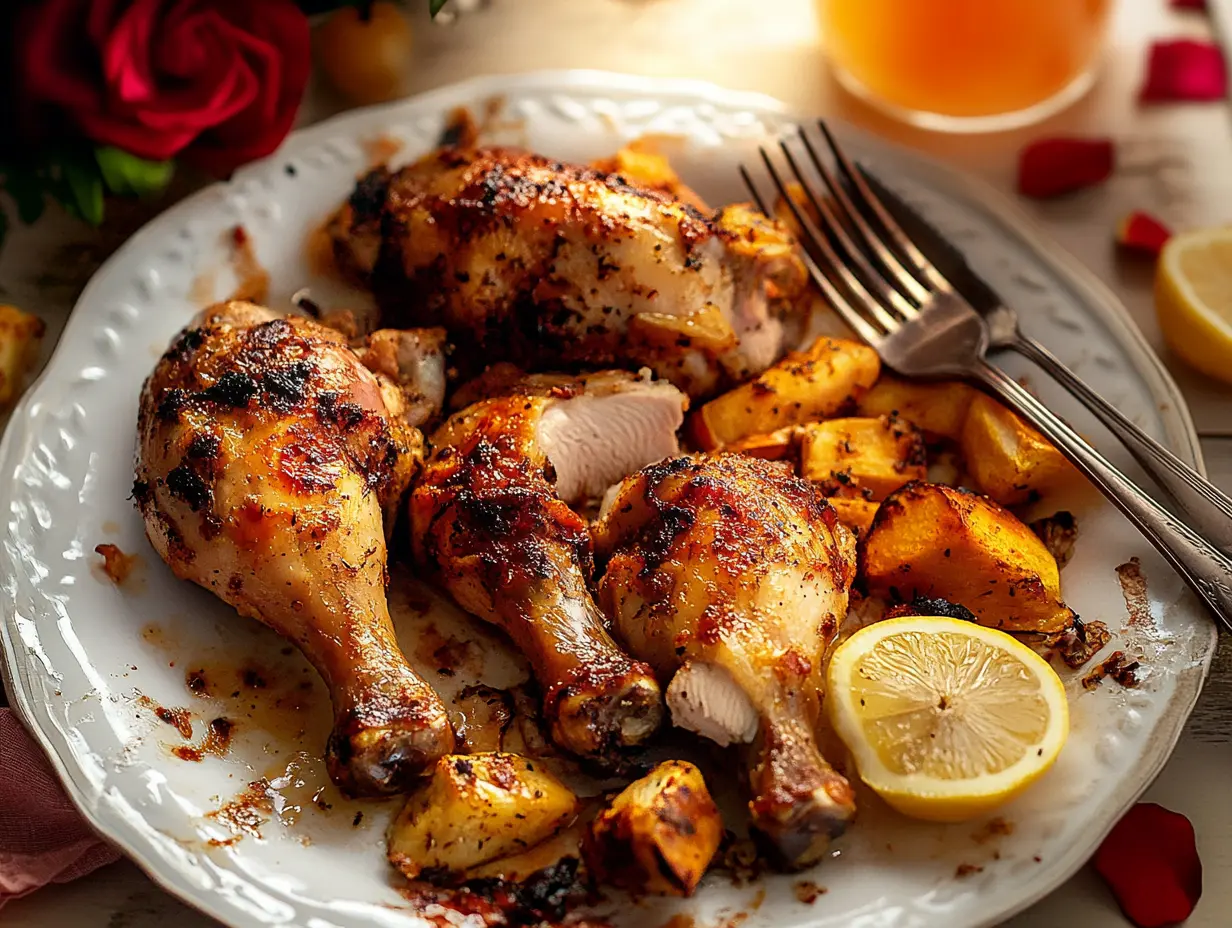
If you’re looking for a foolproof way to make crispy, juicy chicken legs, this Oven Baked Chicken Legs recipe is exactly what you need! With a perfectly seasoned crispy skin and tender, juicy meat inside, these baked drumsticks are easy to prepare and full of rich, roasted flavor.
This no-fuss, family-friendly meal is ideal for busy weeknights, meal prep, or weekend gatherings. Plus, it’s completely customizable, allowing you to use your favorite seasonings, marinades, or sauces to create a dish that suits your taste.
Why You’ll Love This Recipe
✅ Crispy & Juicy – The perfect balance of crispy skin and tender, juicy meat.
✅ Super Easy to Make – No frying required—just season, bake, and enjoy!
✅ Budget-Friendly – Chicken legs are one of the most affordable cuts of chicken.
✅ Perfect for Meal Prep – Great for quick lunches or easy weeknight dinners.
💡 Love chicken? Try our Chicken Casserole Recipes for another hearty and satisfying meal!
Recipe Snapshot
⏱ Prep Time: 10 minutes
🔥 Cook Time: 40 minutes
🌿 Other Time (if needed): None
⏳ Total Time: 50 minutes
🥣 Course: Main Course
🌍 Cuisine: American
🍽 Servings: 4-6
Table of Contents – Find Exactly What You’re Looking For!
Table of Contents – Find Exactly What You’re Looking For!
Ingredients & Equipment Needed for Oven Baked Chicken Legs
Before we begin, gather all the necessary ingredients and tools to make crispy, flavorful oven baked chicken legs effortlessly!
Essential Equipment:
✔ Baking sheet with wire rack – Helps air circulate for extra crispy skin.
✔ Mixing bowl – For seasoning the chicken.
✔ Tongs – To handle and flip the chicken.
✔ Basting brush (optional) – For adding extra sauce or marinade.
✔ Meat thermometer – Ensures perfectly cooked chicken.
💡 Don’t have a wire rack? Place chicken directly on parchment paper, but flip halfway through baking for even crispiness!
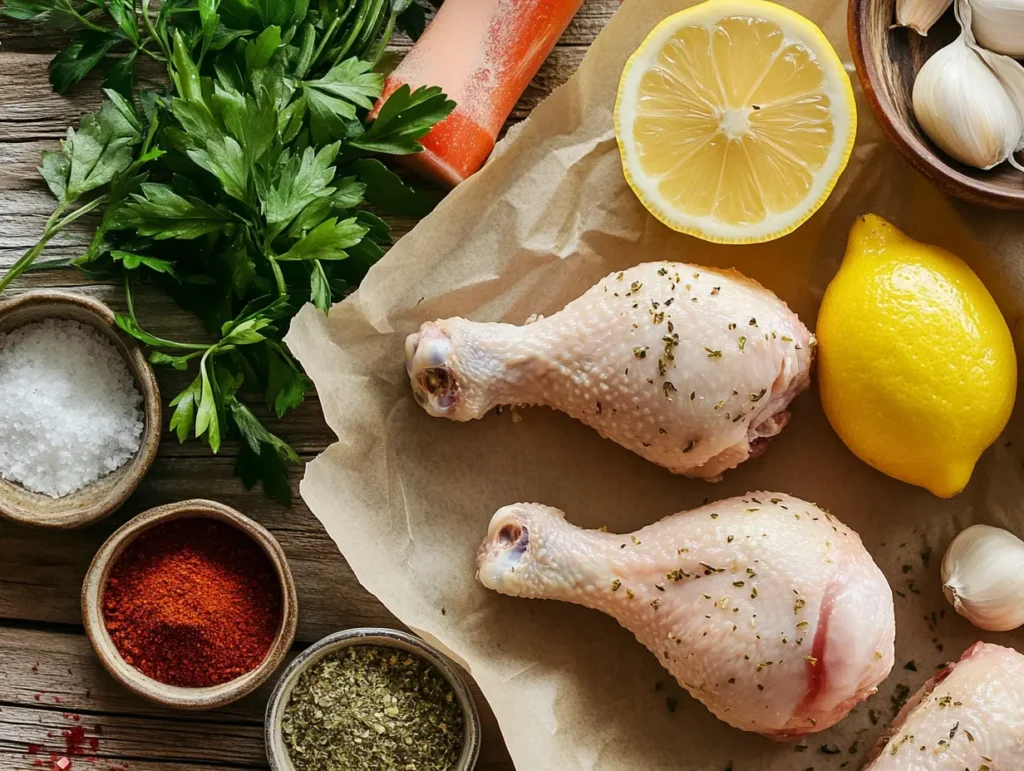
Ingredients:
For the Chicken:
- 6 chicken legs (drumsticks)
- 2 tablespoons olive oil (or melted butter for extra richness)
For the Seasoning Blend:
- 1 teaspoon salt
- 1 teaspoon black pepper
- 1 teaspoon garlic powder
- 1 teaspoon onion powder
- 1 teaspoon smoked paprika (for a smoky kick)
- ½ teaspoon dried thyme (optional, for an herby flavor)
- ½ teaspoon cayenne pepper (optional, for heat)
💡 Want a marinade instead? Swap the dry seasoning for a mix of olive oil, lemon juice, and fresh herbs!
How to Make Oven Baked Chicken Legs
Follow these easy step-by-step instructions to achieve crispy, golden-brown skin and juicy, flavorful chicken every time.
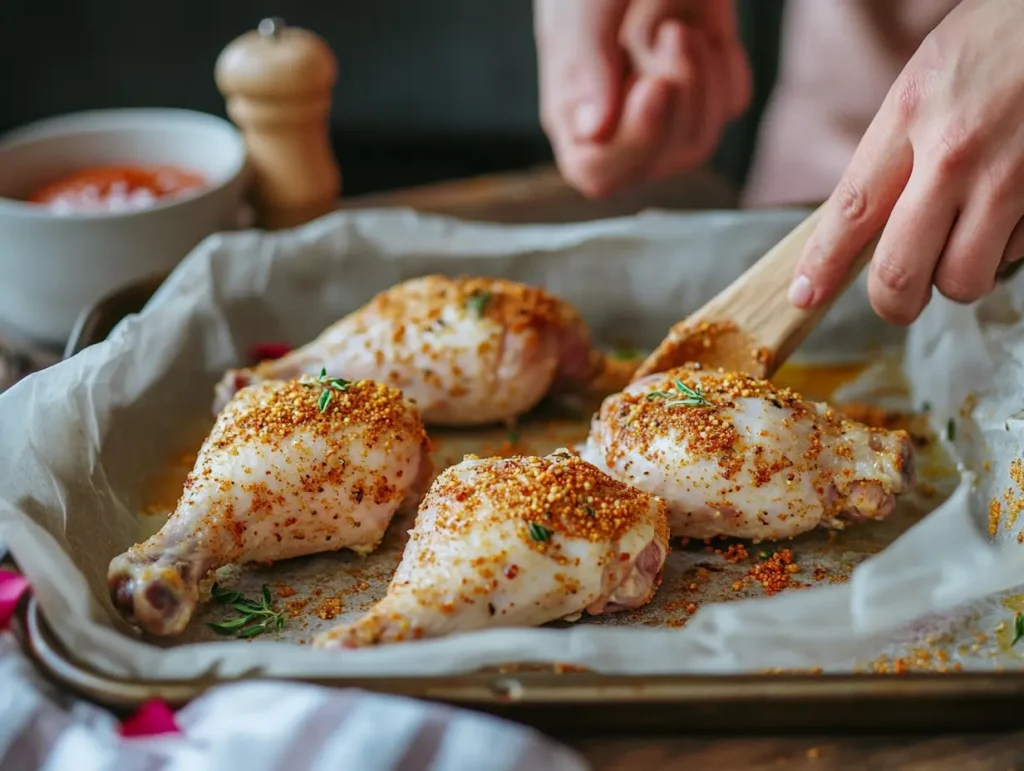
Step 1: Prep the Chicken & Seasoning
1️⃣ Preheat the oven to 400°F (200°C) and line a baking sheet with parchment paper or foil.
2️⃣ Pat the chicken legs dry with paper towels—this helps the seasoning stick and ensures crispier skin.
3️⃣ In a mixing bowl, combine olive oil, garlic powder, onion powder, smoked paprika, thyme, salt, black pepper, and cayenne (if using).
4️⃣ Add the chicken legs to the bowl and toss until evenly coated with the seasoning mixture.
💡 Pro Tip: Let the chicken rest at room temperature for 10-15 minutes before baking for even cooking!
Step 2: Arrange & Bake
5️⃣ Place the chicken legs on the baking sheet in a single layer, skin-side up. If using a wire rack, place it over the baking sheet and arrange the chicken on top for better airflow.
6️⃣ Bake in the preheated oven for 40-45 minutes, flipping the chicken halfway through for even browning.
💡 Want extra crispy skin? Turn on the broiler for the last 2-3 minutes to crisp up the skin without overcooking the meat!
Step 3: Check for Doneness
7️⃣ Use a meat thermometer to check for an internal temperature of 165°F (75°C) at the thickest part of the leg.
8️⃣ Remove from the oven and let the chicken rest for 5 minutes before serving—this helps lock in the juices!
Step 4: Serve & Enjoy
9️⃣ Serve hot with your favorite sides, dipping sauces, or salads.
🔟 Garnish with fresh parsley, a squeeze of lemon, or extra seasoning for added flavor.
💡 Looking for another comforting chicken dish? Try our Chicken and Leek Soup for a cozy, nutritious meal!
Expert Tips & Tricks for the Best Oven Baked Chicken Legs
Follow these pro tips to make sure your Oven Baked Chicken Legs turn out perfectly crispy on the outside and juicy on the inside every time!
1. Pat the Chicken Dry for Crispy Skin
✅ Removing excess moisture helps the skin crisp up in the oven.
✅ Use paper towels to pat the chicken legs dry before seasoning.
💡 Pro Tip: Let the chicken sit uncovered in the fridge for 30 minutes before baking for even crispier skin!
2. Use a Wire Rack for Better Air Circulation
✅ Placing the chicken on a wire rack over a baking sheet allows heat to circulate evenly.
✅ This prevents soggy bottoms and results in evenly crisped skin.
💡 No wire rack? Flip the chicken halfway through baking to crisp both sides!
3. Don’t Skip the Resting Time
✅ Letting the chicken rest for 5 minutes after baking locks in the juices.
✅ Cutting into the meat too soon will cause the juices to escape, making it dry.
💡 For extra flavor, brush the chicken with melted butter & garlic right after baking!
4. Check the Internal Temperature for Perfect Doneness
✅ Always use a meat thermometer to check that the thickest part reaches 165°F (75°C).
✅ If the skin isn’t crispy enough, broil for an extra 2-3 minutes at the end of cooking.
💡 Like extra crispy skin? Lightly coat the chicken with a thin layer of baking powder before seasoning!
5. Customize Your Flavor
✅ Spicy: Add cayenne pepper or chili powder for heat.
✅ Garlic Butter: Toss with melted garlic butter before serving.
✅ BBQ Style: Brush with BBQ sauce in the last 10 minutes of baking.
✅ Lemon Herb: Add lemon zest and Italian seasoning for a fresh twist.
💡 Want a different chicken recipe? Try our Lemon Spinach Ginger Chicken Soup for a light and refreshing meal!
Serving Suggestions & Best Pairings for Oven Baked Chicken Legs
These Oven Baked Chicken Legs pair beautifully with a variety of sides, making them perfect for a balanced meal. Whether you’re looking for something hearty, fresh, or light, here are some delicious options.
1. Classic Comfort Food Sides
✅ Garlic Mashed Potatoes – Creamy and buttery, perfect for soaking up juices.
✅ Roasted Vegetables – A mix of carrots, bell peppers, and zucchini for a wholesome touch.
✅ Mac and Cheese – A rich, cheesy side that complements the crispy chicken.
💡 Pro Tip: Drizzle extra pan juices over mashed potatoes for extra flavor!
2. Fresh & Light Pairings
✅ Crisp Garden Salad – A mix of greens, tomatoes, cucumbers, and a tangy vinaigrette.
✅ Coleslaw – Creamy or vinegar-based, it adds a refreshing crunch.
✅ Lemon Herb Quinoa – A protein-packed, light alternative to rice.
💡 Want a refreshing soup? Try our Chicken and Leek Soup for a warm, nutritious side!
3. Dipping Sauces for Extra Flavor
✅ Homemade Ranch – A creamy dip that complements the crispy skin.
✅ BBQ Sauce – Sweet, smoky, and perfect for a Southern-style twist.
✅ Honey Mustard – A tangy-sweet pairing that adds a zingy kick.
💡 For extra flavor, brush the chicken legs with your favorite sauce during the last 10 minutes of baking!
4. The Best Drinks to Serve with Chicken Legs
✅ Iced Tea – Sweet or unsweetened, it pairs well with savory dishes.
✅ Lemonade – A zesty and refreshing choice.
✅ Red Wine or Sparkling Water – For a sophisticated yet simple pairing.
💡 Looking for a cozy, healing drink? Try our Anise Tea for a warm, soothing beverage!
Storage & Reheating Tips for Oven Baked Chicken Legs
These Oven Baked Chicken Legs store and reheat beautifully, making them perfect for meal prep or leftovers. Follow these simple tips to keep them juicy and flavorful.
1. How to Store Leftovers
✅ Refrigerator: Store in an airtight container for up to 4 days.
✅ Freezer: Wrap the chicken legs tightly in foil or freezer-safe bags and store for up to 3 months.
✅ Best Container: Use glass containers or meal prep containers to maintain freshness.
💡 Pro Tip: If freezing, let the chicken cool completely before storing to prevent excess moisture buildup.
2. Best Ways to Reheat Without Drying Out
✅ Oven Method (Best for Crispy Skin)
1️⃣ Preheat oven to 375°F (190°C).
2️⃣ Place chicken legs on a baking sheet lined with foil.
3️⃣ Cover loosely with foil to prevent drying out.
4️⃣ Bake for 15-20 minutes or until heated through.
✅ Air Fryer Method (Quick & Crispy)
1️⃣ Preheat air fryer to 375°F (190°C).
2️⃣ Place chicken legs in the basket in a single layer.
3️⃣ Heat for 5-7 minutes, shaking the basket halfway through.
✅ Microwave Method (Fastest, But Soft Skin)
1️⃣ Place chicken on a microwave-safe plate.
2️⃣ Cover with a damp paper towel to keep moisture.
3️⃣ Heat in 30-second intervals, checking until warm.
💡 Want extra crispiness after reheating? Pop the chicken under the broiler for 2-3 minutes before serving!
3. Can You Make This Recipe Ahead of Time?
✅ Yes! Bake the chicken legs up to 2 days in advance and store in the fridge.
✅ Reheat using one of the methods above for an easy, quick meal.
💡 For meal prep, store chicken with roasted veggies or rice for a ready-to-go lunch!
Nutritional Information for Oven Baked Chicken Legs
These Oven Baked Chicken Legs are not only delicious and satisfying but also a great source of protein. Below is the estimated nutritional breakdown per serving (based on a 4-serving batch).
Estimated Nutrition Per Serving
✅ Calories: ~320 kcal
✅ Protein: ~28g
✅ Carbohydrates: ~2g
✅ Fiber: ~0.5g
✅ Sugars: ~0g
✅ Fat: ~22g
✅ Saturated Fat: ~5g
✅ Cholesterol: ~110mg
✅ Sodium: ~450mg
Health Benefits of This Recipe
✅ High-Protein Meal – Supports muscle growth and keeps you full longer.
✅ Low-Carb & Keto-Friendly – Perfect for low-carb and keto diets.
✅ Rich in Healthy Fats – Olive oil and chicken skin provide beneficial fats.
✅ Gluten-Free & Dairy-Free – A great option for those with food sensitivities.
💡 Want a lighter version? Remove the skin before baking to cut down on fat and calories!
Frequently Asked Questions (FAQs) About Oven Baked Chicken Legs
Here are answers to common questions to help you perfect your Oven Baked Chicken Legs every time!
1. How Long Should I Bake Chicken Legs at 400°F?
✅ Bake for 40-45 minutes at 400°F (200°C) for crispy skin and juicy meat.
✅ Use a meat thermometer to check that the internal temperature reaches 165°F (75°C).
💡 Want extra crispiness? Broil for 2-3 minutes at the end!
2. Can I Use Boneless Chicken Legs for This Recipe?
✅ Yes, but boneless chicken legs cook faster.
✅ Bake at 400°F (200°C) for 25-30 minutes or until the internal temperature reaches 165°F (75°C).
💡 Boneless chicken may dry out faster, so check the temperature early!
3. Should I Cover the Chicken While Baking?
✅ No! Leaving the chicken uncovered helps achieve crispy skin.
✅ If the skin is browning too quickly, loosely tent with foil in the last 10 minutes.
4. Can I Make This Recipe in an Air Fryer?
✅ Yes! Air fry at 375°F (190°C) for 25-30 minutes, flipping halfway through.
✅ The air fryer method results in extra crispy skin without drying out the meat.
💡 Check for doneness with a meat thermometer before serving!
5. Can I Marinate the Chicken for Extra Flavor?
✅ Absolutely! Marinate for at least 30 minutes or overnight for deeper flavor.
✅ Try a garlic herb marinade, BBQ sauce, or lemon pepper seasoning.
💡 For best results, pat the chicken dry before baking to ensure crispy skin!
Conclusion on Oven Baked Chicken Legs
These Oven Baked Chicken Legs are the perfect easy, flavorful, and foolproof dish for any night of the week. With crispy golden skin and juicy, tender meat, this recipe is a go-to favorite for busy families, meal prep, or a budget-friendly dinner.
Whether you enjoy them with classic sides, fresh salads, or your favorite dipping sauces, these baked chicken legs are guaranteed to be a hit at the dinner table.

More Chicken Recipes to Try
✅ Grandma’s Chicken Soup Recipe – A comforting, slow-simmered classic.
✅ Chicken and Leek Soup – A creamy, hearty take on chicken soup.
✅ Lemon Spinach Ginger Chicken Soup – A light and refreshing immune-boosting dish.
Join the Conversation!
💬 Tried this recipe? Let me know how it turned out in the comments!
📌 Save this recipe on Pinterest & share it with your friends!
📢 Follow me for more homemade snack ideas:
- Instagram: [@CathyRecipes]
- Facebook: Cathy’s Facebook Profile
- Pinterest: Cathy’s Pinterest
✅ Don’t forget to rate this recipe! Your feedback helps others discover and enjoy it too!